系统环境
Centos 6.5
Iptables:off
Selinux:disabled
由于MBR分区表只支持2T的硬盘,/dev/sdb是一块10T的硬盘,使用GPT分区表,需要使用parted工具分区
使用fdisk查看磁盘
ps:这个之后又增加了一块10T的硬盘,这个截图早一点,没提现出来
使用parted工具分区
1 | [root@sg020 ~]# parted /dev/sdb |
GNU Parted 2.1
Using /dev/sdb
Welcome to GNU Parted! Type ‘help’ to view a list of commands.
(parted) print
Model: VMware Virtual disk (scsi)
Disk /dev/sdb: 9896GB
Sector size (logical/physical): 512B/512B
Partition Table: gpt
Number Start End Size File system Name Flags
(parted) mkpart primary 0 10T
Warning: The resulting partition is not properly aligned for best performance.
Ignore/Cancel? Ignore
(parted) print
Model: VMware Virtual disk (scsi)
Disk /dev/sdb: 9896GB
Sector size (logical/physical): 512B/512B
Partition Table: gpt
Number Start End Size File system Name Flags
1 17.4kB 9896GB 9896GB primary
(parted) quit
Information: You may need to update /etc/fstab.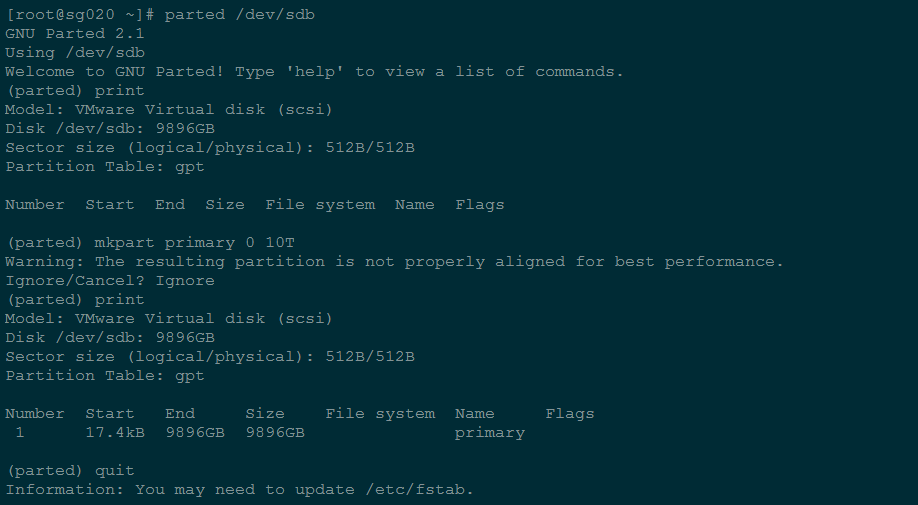
(parted) set 1 lvm on
(parted) print
Model: VMware Virtual disk (scsi)
Disk /dev/sdb: 9896GB
Sector size (logical/physical): 512B/512B
Partition Table: gpt
Number Start End Size File system Name Flags
1 17.4kB 9896GB 9896GB ext4 primary lvm
(parted) quit
Information: You may need to update /etc/fstab.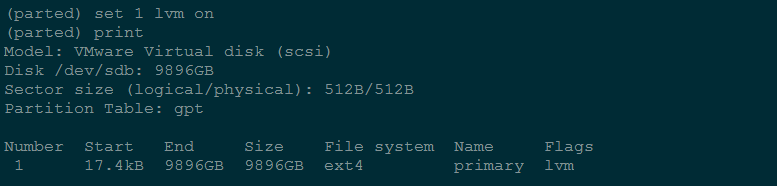
1 | [root@sg020 ~]# parted /dev/sdc |
GNU Parted 2.1
Using /dev/sdc
Welcome to GNU Parted! Type ‘help’ to view a list of commands.
(parted) print
Error: /dev/sdc: unrecognised disk label
(parted) mklabel gpt
(parted) print
Model: VMware Virtual disk (scsi)
Disk /dev/sdc: 11.0TB
Sector size (logical/physical): 512B/512B
Partition Table: gpt
Number Start End Size File system Name Flags
(parted) mkpart primary 0 10995G
Warning: The resulting partition is not properly aligned for best performance.
Ignore/Cancel? Ignore
(parted) print
Model: VMware Virtual disk (scsi)
Disk /dev/sdc: 11.0TB
Sector size (logical/physical): 512B/512B
Partition Table: gpt
Number Start End Size File system Name Flags
1 17.4kB 11.0TB 11.0TB primary
(parted) set 1 lvm on
(parted) print
Model: VMware Virtual disk (scsi)
Disk /dev/sdc: 11.0TB
Sector size (logical/physical): 512B/512B
Partition Table: gpt
Number Start End Size File system Name Flags
1 17.4kB 11.0TB 11.0TB primary lvm
(parted) quit
Information: You may need to update /etc/fstab.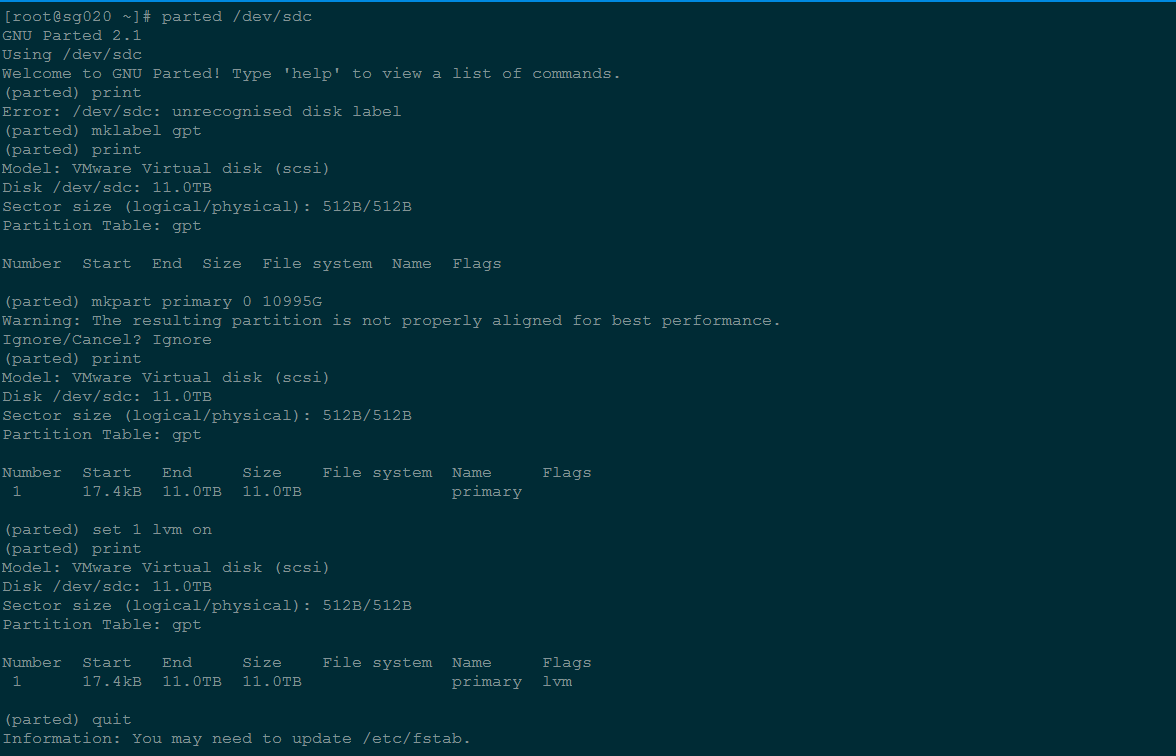
lvm 划分
创建pv
1 | [root@sg020 ~]# pvcreate /dev/sdb1 /dev/sdc1 |
dev_is_mpath: failed to get device for 8:17
Physical volume “/dev/sdb1” successfully created
dev_is_mpath: failed to get device for 8:33
Physical volume “/dev/sdc1” successfully created
1 | [root@sg020 ~]# pvdisplay |
— Physical volume —
PV Name /dev/sda2
VG Name vg_sg020
PV Size 193.51 GiB / not usable 3.00 MiB
Allocatable yes (but full)
PE Size 4.00 MiB
Total PE 49538
Free PE 0
Allocated PE 49538
PV UUID BF6Ikw-eYtl-HfNM-Nnmt-WLK4-xb8O-KAnZtB
“/dev/sdb1” is a new physical volume of “9.00 TiB”
— NEW Physical volume —
PV Name /dev/sdb1
VG Name
PV Size 9.00 TiB
Allocatable NO
PE Size 0
Total PE 0
Free PE 0
Allocated PE 0
PV UUID aPPVxz-oeWE-lP9l-AeZU-p699-pffd-O7T3dW
“/dev/sdc1” is a new physical volume of “10.00 TiB”
— NEW Physical volume —
PV Name /dev/sdc1
VG Name
PV Size 10.00 TiB
Allocatable NO
PE Size 0
Total PE 0
Free PE 0
Allocated PE 0
PV UUID MWbqIl-WI66-JCsc-x0Re-UqjL-HgXB-Vw1jge
创建vg
1 | [root@sg020 ~]# vgcreate vg_fuz /dev/sdb1 /dev/sdc1 |
Volume group “vg_fuz” successfully created
1 | [root@sg020 ~]# vgdisplay |
— Volume group —
VG Name vg_fuz
System ID
Format lvm2
Metadata Areas 2
Metadata Sequence No 1
VG Access read/write
VG Status resizable
MAX LV 0
Cur LV 0
Open LV 0
Max PV 0
Cur PV 2
Act PV 2
VG Size 19.00 TiB
PE Size 4.00 MiB
Total PE 4980734
Alloc PE / Size 0 / 0
Free PE / Size 4980734 / 19.00 TiB
VG UUID ruDcio-mmt5-z6YD-7HS0-fbst-GIlT-SwmvcF
— Volume group —
VG Name vg_sg020
System ID
Format lvm2
Metadata Areas 1
Metadata Sequence No 4
VG Access read/write
VG Status resizable
MAX LV 0
Cur LV 3
Open LV 3
Max PV 0
Cur PV 1
Act PV 1
VG Size 193.51 GiB
PE Size 4.00 MiB
Total PE 49538
Alloc PE / Size 49538 / 193.51 GiB
Free PE / Size 0 / 0
VG UUID 2E6Hdt-xWhi-DyLX-pDva-3WTw-fDNx-Qytoqg
创建lv
1 | [root@sg020 ~]# lvcreate -n lv_fuz -l 4980734 vg_fuz |
Logical volume “lv_fuz” created
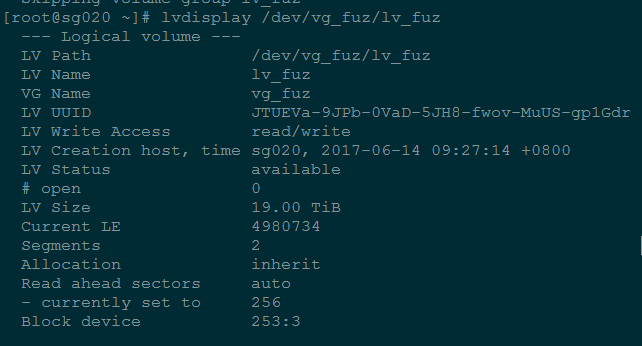
1 | [root@sg020 ~]# lvdisplay |
1 | --- Logical volume --- |
格式化分区
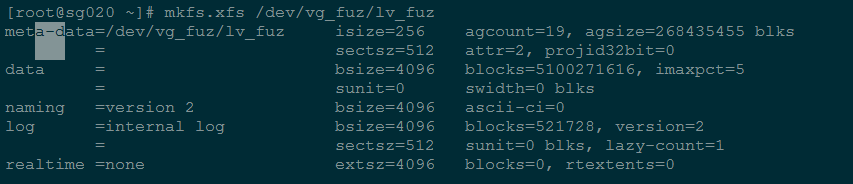
1 | [root@sg020 ~]# mkfs.ext4 /dev/vg_fuz/lv_fuz |
ext4格式的分区,不支持大于16TB的硬盘分区,我们使用xfs格式
1 | [root@sg020 ~]# yum install xfsprogs |
查找分区UUID
1 | [root@sg020 ~]# blkid /dev/vg_fuz/lv_fuz |
添加到fstab
1 | [root@sg020 ~]# mkdir /data |
挂载分区
1 | [root@sg020 ~]# mount –a |

查看安装nfs软件
1 | [root@sg020 ~]# yum -y install nfs-utils rpcbind |
nfs-utils-1.2.3-39.el6.x86_64
nfs-utils-lib-1.1.5-6.el6.x86_64
nfs4-acl-tools-0.3.3-6.el6.x86_6
1 | [root@sg020 ~]# rpm -qa |grep rpcbind |
rpcbind-0.2.0-11.el6.x86_64
1 | /etc/exports文件内容格式: |
1 | [root@sg020 ~]# cat /etc/exports |
1 | NFS的常用目录 |
启动服务
1 | [root@sg020 ~]# /etc/init.d/rpcbind start |
1 | [root@sg020 ~]# /etc/init.d/nfs start |
1 | [root@sg020 ~]# chkconfig --level 35 rpcbind on |
重新共享所有目录并输出详细信息
1 | [root@sg020 ~]# exportfs -rv |
卸载所有共享目
1 | [root@sg020 ~]# exportfs -au |
客户端挂载
1 | [root@sg011 ~]# mount -t nfs sg020:/data/ /data |

user & group 是nobody的问题
由于centos6以后采用的是nfs v4,所以在挂载后,服务端和客户端看到的信息不一致,客户端看到文件的user和group都是nobody 或nfsnobody,以下是解决办法
服务端
修改配置文件
1 | # vi /etc/idmapd.conf |
重启服务
1 | /etc/init.d/rpcidmapd restart |
客户端
修改配置文件
1 | # vi /etc/idmapd.conf |
清除缓存
1 | nfsidmap -c |
重启服务
1 | /etc/init.d/rpcidmapd restart |
问题解决
重启之后,如果客户端提示“Stale file handle”,三种解决方法:
1 | 1. umount /data;mount -a |
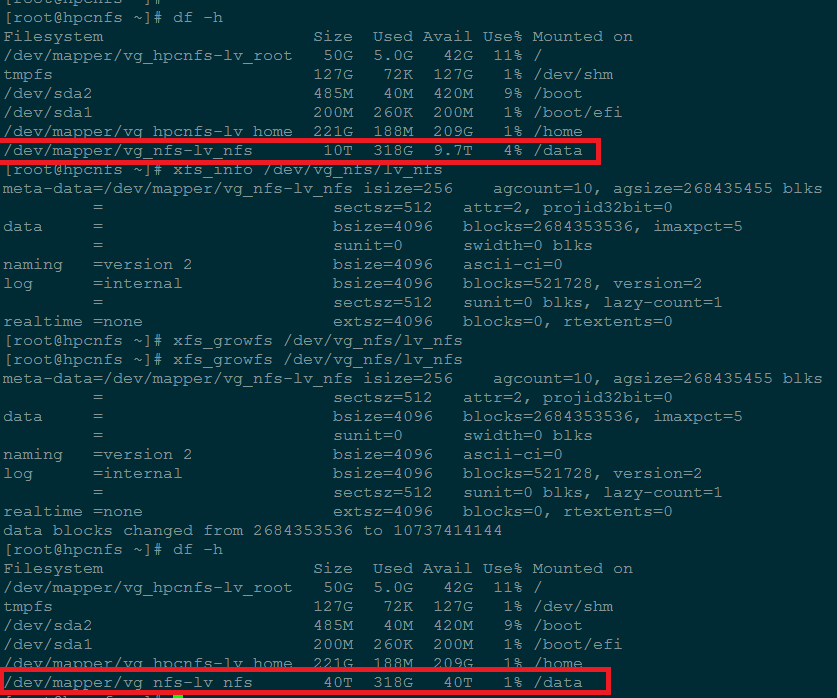
lvm扩容,“resize2fs: Device or resource busy while trying to open”,解决方法如下:
其实做lvm不需要分区,直接将整个盘做成pv;扩容的vg时候,可以更懒一点,pv都不用做,直接vgextend;
1 | vgextend vg_fuz /dev/sdc |
在扩容lv的时候,更加方便的做法是使用pe扩容,而不是容量(-L是容量,-l是PE,可以通过vgdisplay查看剩余);
1 | lvextend -l +3000 /dev/vg_fuz/lv_fuz |
fdisk可以看到到容量已经变化了,但是df还看不出来,我们可以使用resize2fs命令重设;
1 | resize2fs /dev/vg_fuz/lv_fuz |
xfs 文件系统 resize2fs已经不适用了,需要用到一个新的命令xfs_growfs;
1 | xfs_growfs /dev/vg_fuz/lv_fuz |
因为整个环境是内网环境,需要拨vpn才能访问,我没有配置iptables,nfs的iptables配置也比较麻烦,回头研究一下;
另,今天遇到一个很有意思的情况(其实就是自己学艺不精),由于Nfs给两个网段提供服务,牵扯到一个跨网段的问题;我看了下服务器上的配置的网络情况,根据ip地址所在的网段(218.193.126.x和59.77.252.x)和子网掩码(25和26),配置了/data 218.193.126.0/25(insecure,rw,async,no_all_squash) 59.77.252.0/26(insecure,rw,async,no_all_squash),之后的情况就很诡异,59这个网络是可以正常访问的,218这个网络提示没有权限(mount.nfs: access denied by server while mounting sg020:/data/),搞得我很纳闷,配置到精确的ip地址就没有问题;后来经群里高手点播,网络和掩码的计算(218.193.126.0/25意思应该是218.193.126.1~218.193.126.127),我的服务器ip是不在范围内的,回头需要补习一下网络基础。